11 best GatsbyJS plugins for blog and website 2020

Gatsby's been gettin' pretty popular lately, and for good reason. It's used for all sorts of sites, like marketing pages, blogs, and even just static pages you generate. It's a pretty neat framework, and if you're already workin' with React, it makes things a whole lot smoother and more productive.
What is GatsbyJS?
So, what exactly is GatsbyJS? It's basically a React-based framework that's also a static site generator. Think of it like Hugo or Jekyll, but Gatsby's got some advantages that make it stand out. You can check out a detailed comparison here. It's just a really enjoyable and easy tool to use, especially for React developers, makin' your workflow much better.
What are Gatsby plugins?
Gatsby plugins are essentially reusable chunks of code. The Gatsby homepage puts it pretty well: "Gatsby plugins are Node.js packages that implement Gatsby APIs. For larger, more complex sites, plugins let you modularize your site customizations into site-specific plugins." These plugins are super handy for adding functionality to your Gatsby projects without having to write everything from scratch. In this article, we're gonna dive into 11 of the best GatsbyJS plugins you should totally consider for your next React app.
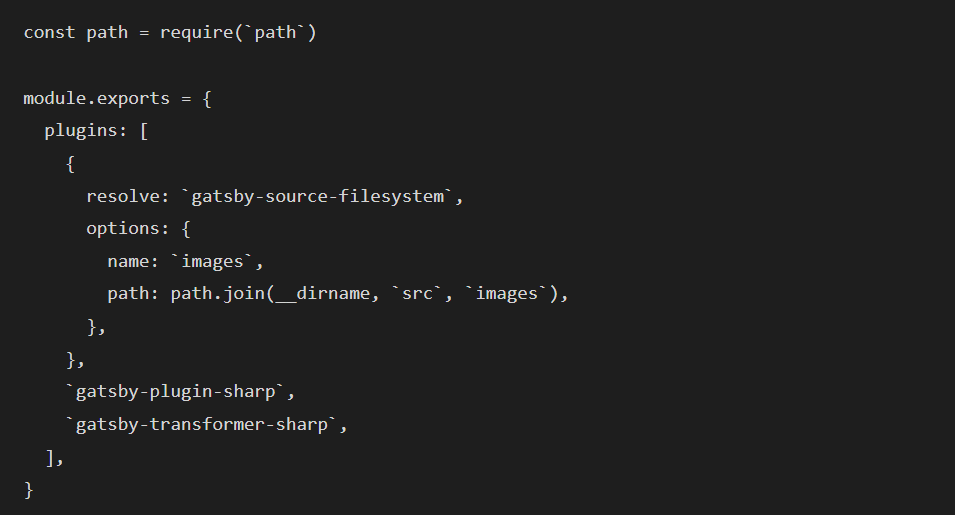
1- gatsby-source-filesystem
This plugin is all about getting data from your local file system into your Gatsby app. It creates "File" nodes, and then other "transformer" plugins can take those file nodes and turn them into different kinds of data. For example, gatsby-transformer-json can turn JSON files into JSON data nodes, and gatsby-transformer-remark can convert Markdown files into MarkdownRemark nodes, which you can then query to get an HTML version of your Markdown.
Installation:
npm install --save gatsby-source-filesystem
How to use it:
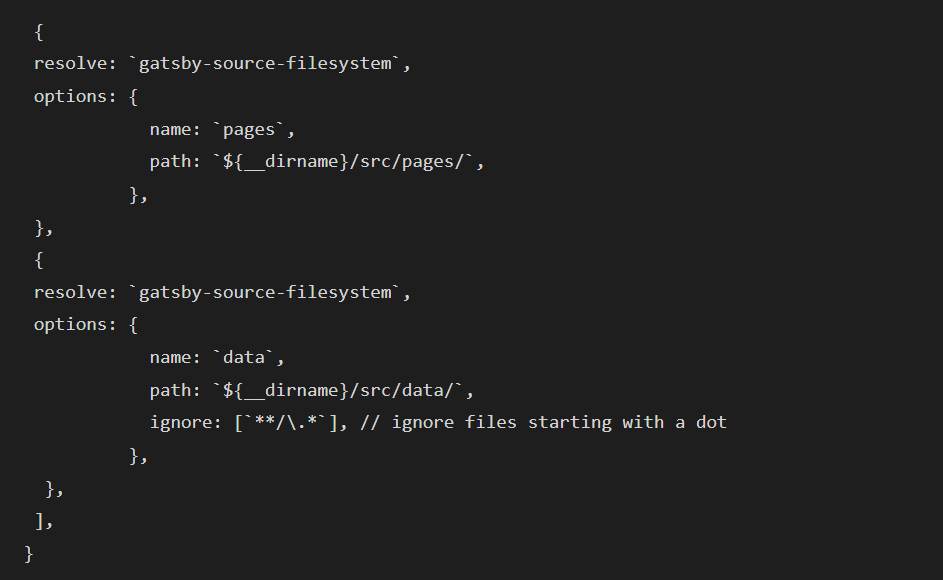
You'll add this to your gatsby-config.js file. You can actually use this plugin multiple times if you have files in different spots. This example shows how you might set it up to pull Markdown files from a pages directory and data files (like .json, .yaml, or .csv) from a data directory, kinda like the Jekyll setup.
You can find the full documentation here.
2- gatsby-plugin-manifest
This plugin helps you create a web app manifest, which is part of the PWA spec. It lets users add your site to their home screen on mobile browsers. The manifest gives the phone all the configuration and icons it needs. Plus, this plugin does more than just the manifest:
- Auto icon generation: Makes different icon sizes from one source.
- Favicon support: Handles favicons.
- Legacy icon support: For iOS.
- Cache busting: Helps with caching.
- Localization: Creates unique manifests for different languages.
You've got a lot of control over all these features with plenty of configuration options.
Installation:
First, install the plugin:

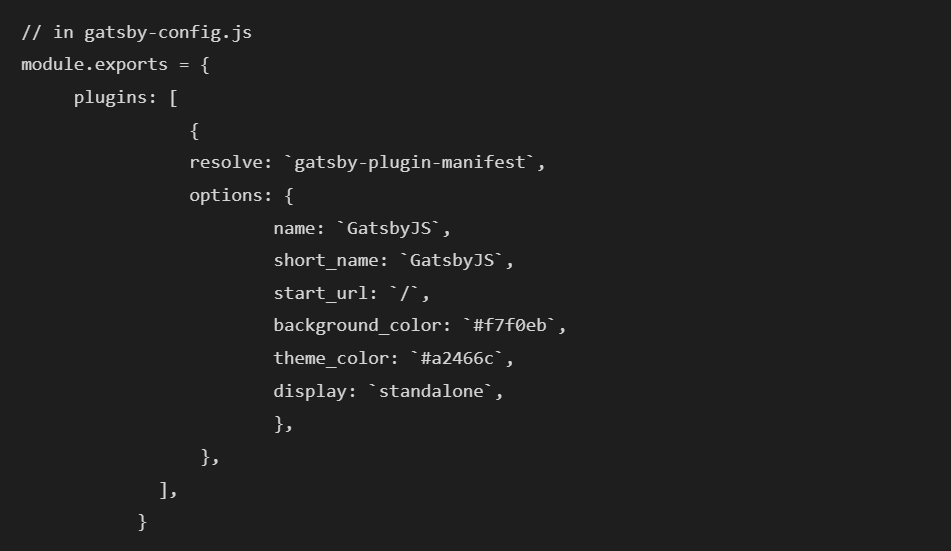
Then, add the plugin and manifest settings to your gatsby-config.js:
Important Note: If you're using this with gatsby-plugin-offline, make sure gatsby-plugin-manifest comes before gatsby-plugin-offline in your config. This way, the manifest file gets cached properly by the service worker.
You can learn more about configuring your web app here and get the full plugin documentation here.
3- gatsby-plugin-sitemap
This plugin lets you generate a sitemap for your website, which is great for search engines and improving your search result rankings. Just a heads-up, it only creates the sitemap when you're building for production.
Installation:

How to use it:
Add this to your gatsby-config.js:

This plugin has a bunch of options, but here are the most common ones:
query: The GraphQL query to get the data for your sitemap.output: The file path where the sitemap will be generated.exclude: Lets you skip certain paths from the sitemap.
The basic setup above is all you need to get it working. By default, it'll include all your site's pages, except for any you've excluded.
Check out the full documentation here.
4. gatsby-plugin-social9-comment
Want to add comments to your website easily? gatsby-plugin-social9-comment is the way to go. Comments are awesome for sparking discussions, especially on blogs. Social9 Comment is fast, free, looks modern, and is pretty secure. It's a good alternative to other comment systems because it's lightweight, privacy-focused, and doesn't sell your data, show ads, or use tracking scripts.
Installation:
npm install --save gatsby-plugin-social9-comment
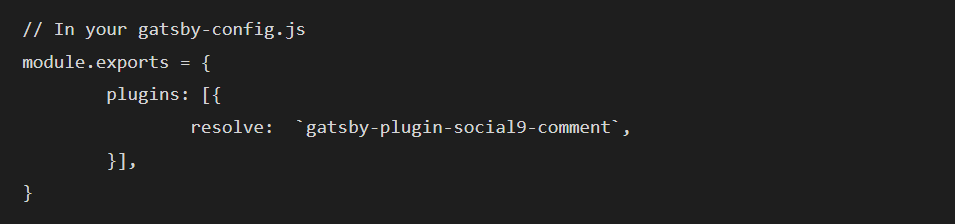
How to use it:
Here's the minimal configuration you'll need in your gatsby-config.js:
For more details, the full documentation is here.
5. gatsby-plugin-google-analytics
This plugin makes it super simple to add Google Analytics to your site. It's smart enough to disable itself during development so you don't mess up your analytics data.
The plugin gets enabled when you run the gatsby serve command.
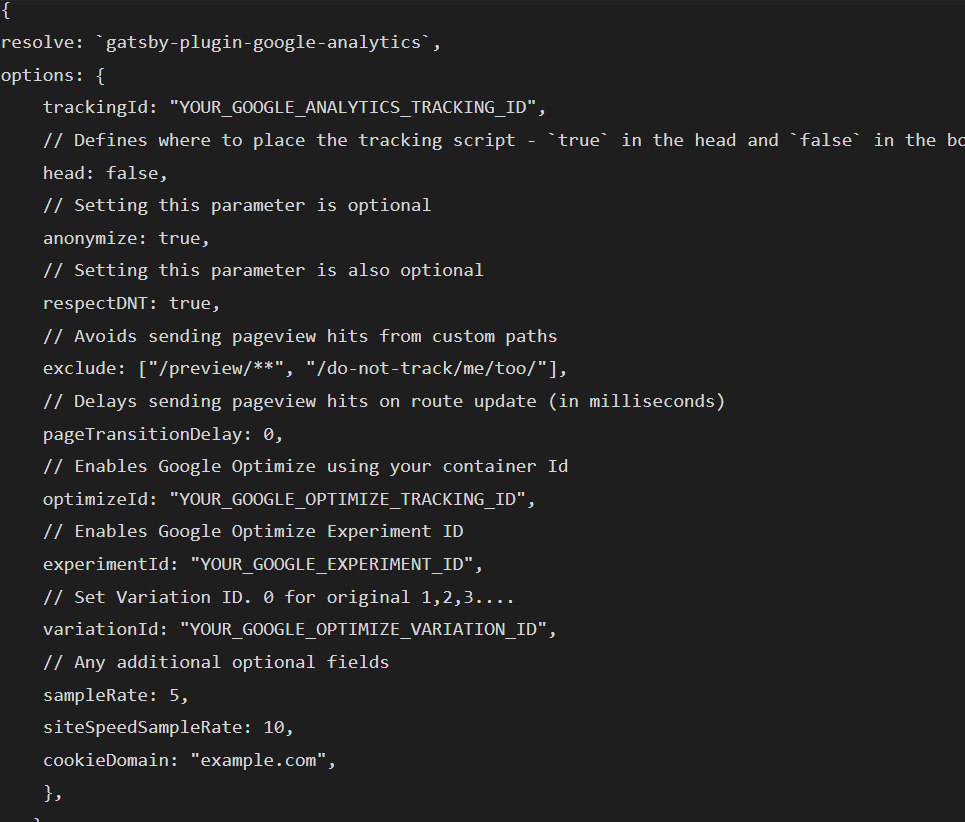
Here are some of the options you can use:
trackingId: Your Google Analytics tracking ID.head: Set totrueif you want the GA script in the<head>tags.anonymize: If you need to anonymize IP addresses (like in Germany), set this totrue.respectDNT: Set totrueto respect the "Do Not Track" setting of visitors.
Installation:
npm install --save gatsby-plugin-google-analytics
How to use it:
Add this to your gatsby-config.js plugins array:
You can find a full list of optional fields here.
Just remember, this plugin is off when you run gatsby develop so your development actions aren't tracked. It turns on automatically after you run gatsby build. You can test it out with gatsby serve.
The full documentation is available here.
6- gatsby-plugin-social9-socialshare
Want to add social sharing buttons to your site? gatsby-plugin-social9-socialshare makes it a breeze. It gives you nice-looking buttons for sharing on over 20 platforms like WhatsApp, Facebook, Twitter, LinkedIn, Reddit, and more, along with analytics.
Installation:
npm install --save gatsby-plugin-social9-socialshare
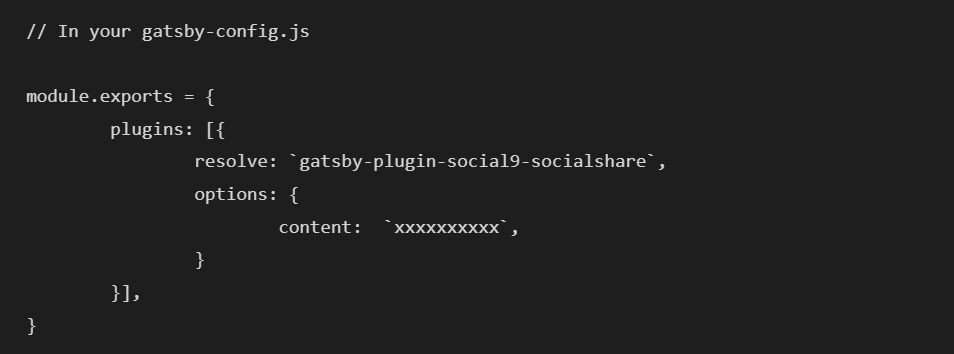
How to use it:
Here's how you'd configure it in your gatsby-config.js:
You can see the full list of optional fields here.
Optional Fields
content: string, // Used to identify the social share account.async: booleandefer: boolean
This is the basic setup needed to get it running. For more info, check out the full documentation here.
7- gatsby-plugin-typography
This Gatsby plugin makes it super easy to use the typography.js library with minimal fuss. You can see it in action in the Tutorial (source).
Installation:
npm install --save gatsby-plugin-typography react-typography typography
How to use it:
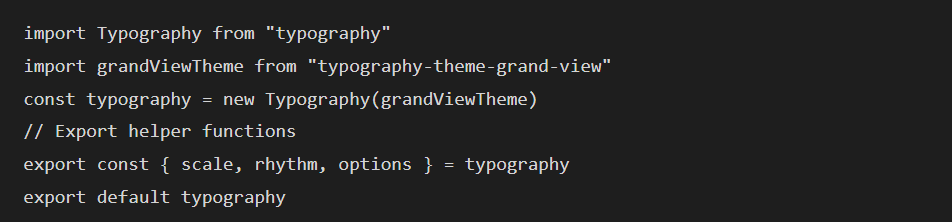
A typical typography.js file, using one of its themes, might look like this:
Normally, you'd have to take the exported stylesheets and inline them in your main file, and also make sure you have the fonts available. But with gatsby-plugin-typography, you just point it to your typography.js file using the pathToConfigModule option. It handles including your typography styles and fonts automatically, keeping your config all in one place and your entry file clean.
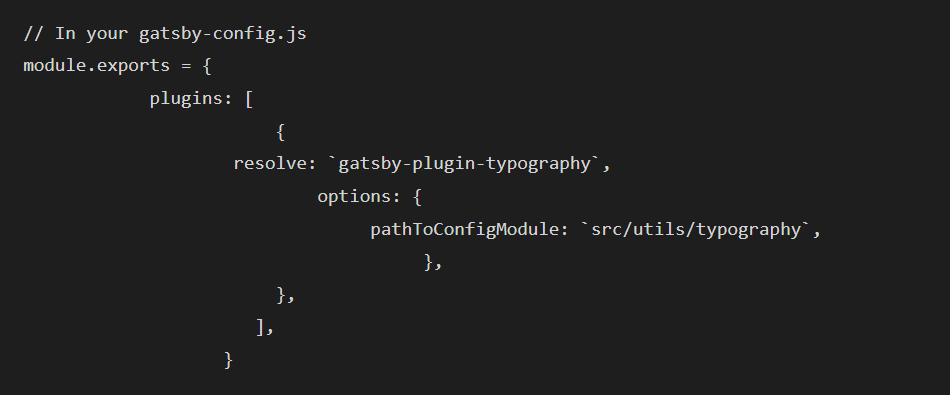
The full documentation is here.
8- gatsby-plugin-webpack-bundle-analyzer
This plugin helps you analyze what's in your Gatsby bundle using webpack-bundle-analyzer.
Installation with Yarn:

Or with npm:

How to use it:
Here's how you'd add it to your gatsby-config.js:

You can find more options here, like:
production: Set totrueto run the analyzer on a production build. Defaults tofalse.disable: Set totrueto turn off the analyzer. Defaults tofalse.
Here's an example with some of those options:
plugins: [{
  resolve: 'gatsby-plugin-webpack-bundle-analyzer',
  options: {
    analyzerPort: 3000,
    production: true,
  }
}]
The full documentation is here.
9- gatsby-plugin-react-helmet
This plugin gives you easy server-side rendering support for data added with React Helmet. React Helmet is a component that lets you control your document's head using React components. With this plugin, any attributes you add in your Helmet component (like titles, meta tags, etc.) will be added to the static HTML pages Gatsby builds. This is super important for both users and SEO, as title and description metadata are key for search engine rankings.
Installation:
npm install --save gatsby-plugin-react-helmet react-helmet
How to use it:
Just add the plugin to the plugins array in your gatsby-config.js:

If you're using gatsby-plugin-offline, you might notice that when you open a link in the background, the title doesn't show up in the tab until you switch to it. This is an upstream issue with React Helmet. You can work around it by passing defer={false} to your Helmet component. For example:

The full documentation is here.
10- gatsby-plugin-offline
gatsby-plugin-offline gives you out-of-the-box support for making your Gatsby site work offline. It creates a service worker for your site and loads it into the client, making your site more resilient to bad network connections.
Important: If you're using this with gatsby-plugin-manifest, make sure gatsby-plugin-offline comes after gatsby-plugin-manifest in your config so the manifest file is included in the service worker.
Installation:
npm install --save gatsby-plugin-offline
How to use it:
Add this to your gatsby-config.js:

The full documentation is here.
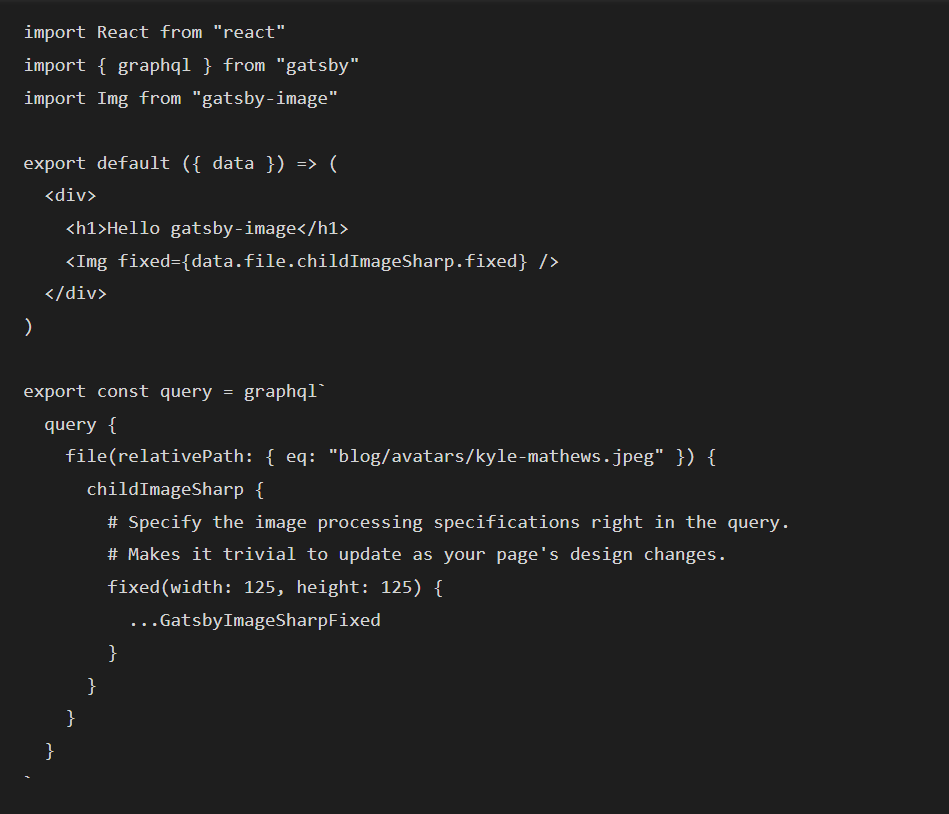
11. gatsby-image
gatsby-image is a React component built to work perfectly with Gatsby's GraphQL queries. It uses Gatsby's built-in image processing capabilities and advanced loading techniques to optimize image loading on your sites. gatsby-image relies on gatsby-plugin-sharp for its image transformations.
Note: gatsby-image is not a direct replacement for the standard <img> tag. It's optimized for fixed-width/height images and images that fill a container's width. Some ways you might use a regular <img> tag won't work with gatsby-image.
Solution
With Gatsby, you can make your images way, way better. gatsby-image is designed to integrate seamlessly with Gatsby's image processing, powered by GraphQL and Sharp. To get perfect images, you just need to:
- Import
gatsby-imageand use it instead of the regularimgtag. - Write a GraphQL query using one of the provided GraphQL "fragments" that specify the fields
gatsby-imageneeds.
The GraphQL query generates multiple thumbnails with optimized JPEG and PNG compression. The gatsby-image component automatically handles the "blur-up" effect and lazy loading for images further down the page.
Installation:
npm install --save gatsby-image
Depending on your Gatsby starter, you might also need gatsby-transformer-sharp and gatsby-plugin-sharp. Make sure they're installed and added to your gatsby-config.js.

Then, in your gatsby-config.js:

Also, ensure you have a source plugin set up so your images are available in GraphQL queries. For example, if your images are in a local folder, you'd set up gatsby-source-filesystem in gatsby-config.js like this:
How to use it:
Here's what a component using gatsby-image looks like:
For more on getting started with gatsby-image, check out this blog post by Kyle Gill: Image Optimization Made Easy with Gatsby.js. Hunter Chang also wrote a great post about changes for Gatsby v2: An Intro To Gatsby Image V2. And there's a free playlist on egghead.io with examples.